Crochet Hat Pattern – The Harvest Beanie

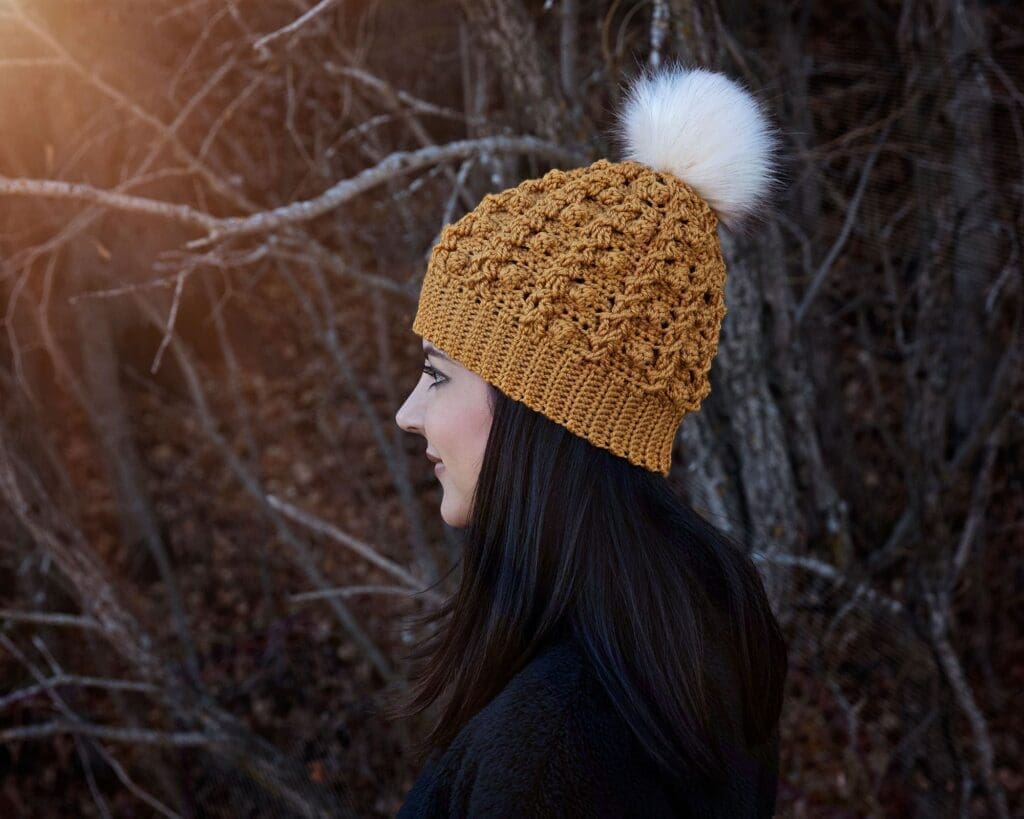
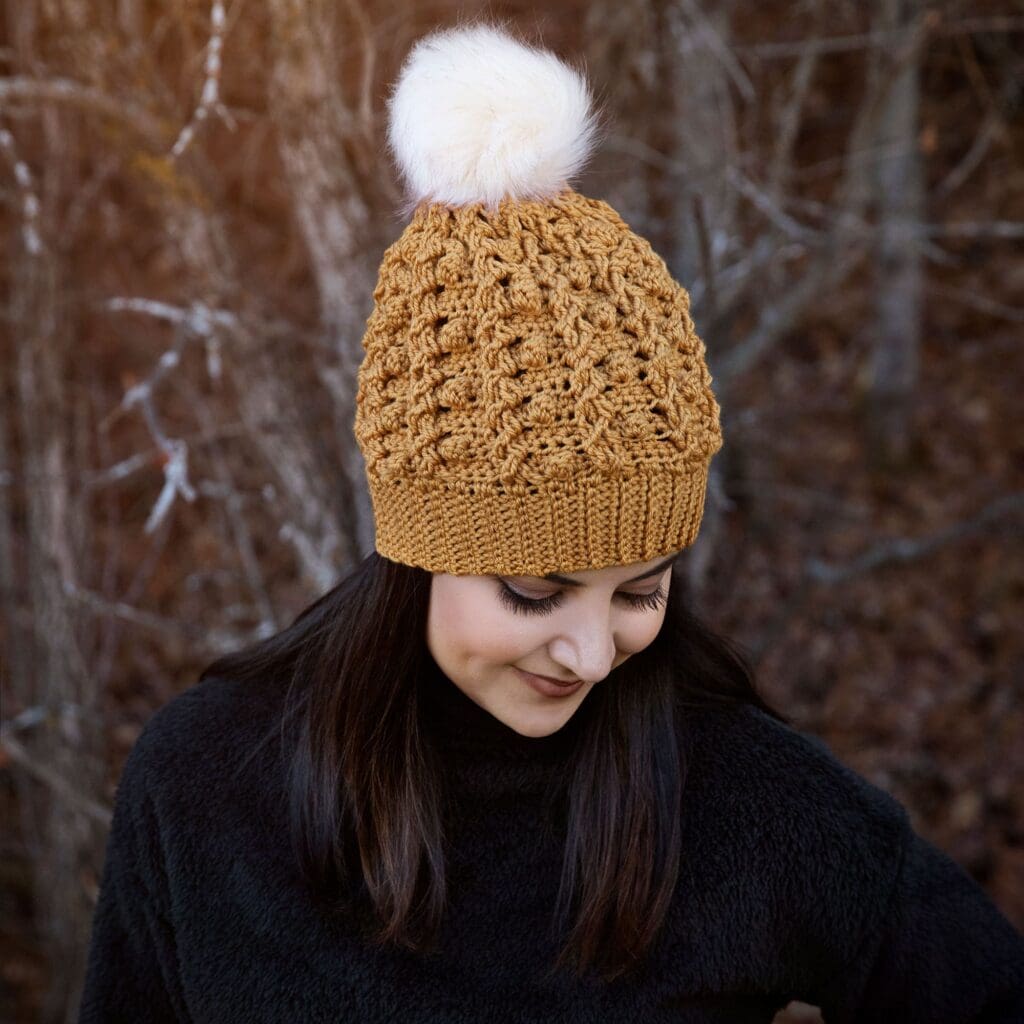
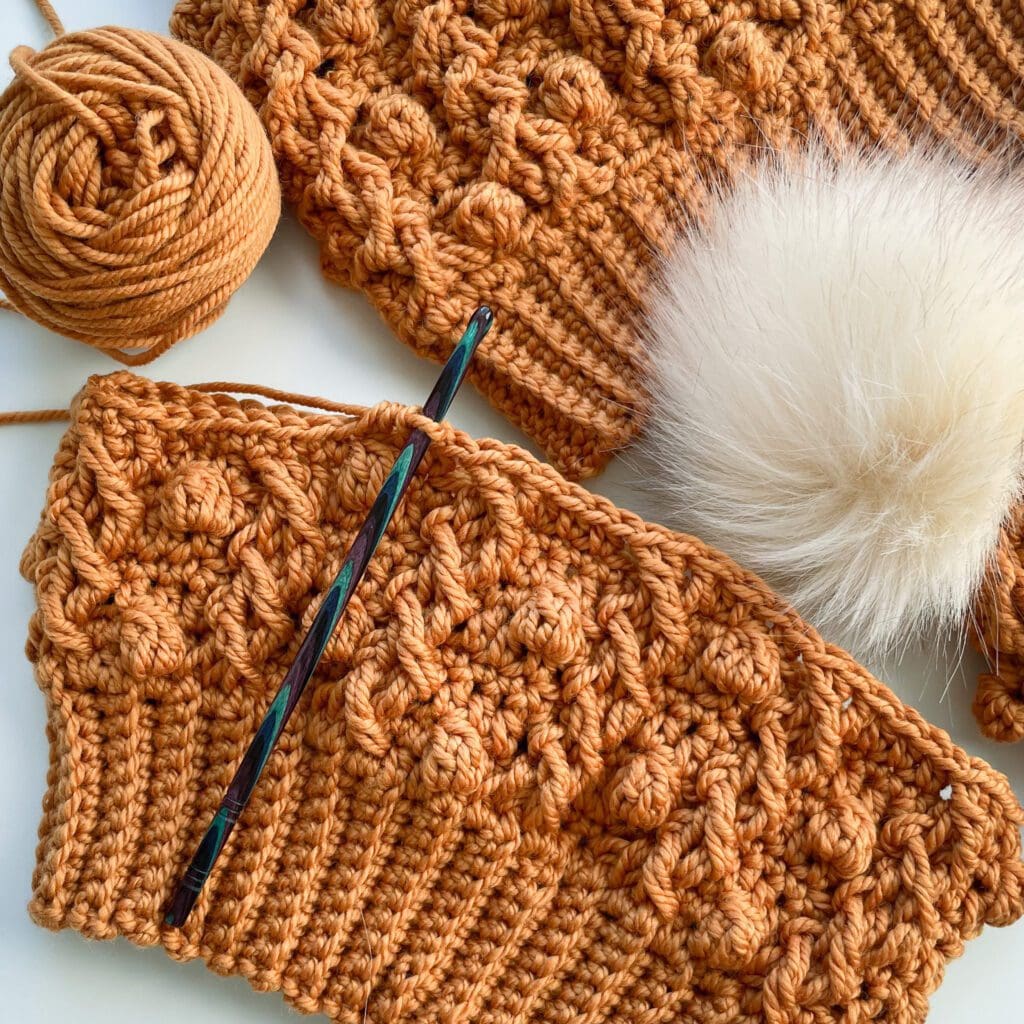
Wow, I can’t believe how fast this year is flying by! It is already November, which means that I have a couple of holiday patterns coming up for you guys. However, I have one more fall pattern to share first! Since my last free pattern was a knit beanie, I decided to make a crochet beanie pattern this time for those of you who prefer to crochet! As you may already know, I love cables and bobbles…. which is why I decided to make this pattern with a combination of both of my favourite crochet stitches! The result is a chunky, super warm beanie that is perfect for keeping your head and ears protected from the chill this fall and winter.
I crocheted the samples for this hat with Knit Picks Twill, in Gold Rush, which a gorgeous rusty orange colour. The combination of bobbles and cables, plus the colour reminded me of pumpkins ready to be harvested for the fall – hence the name, The Harvest Beanie! I hope you enjoy crocheting this pattern as much as I did creating it!
Please note that some of the links on this page are affiliate links and I will earn a commission if you purchase through these links. I use all of the products listed on this page and recommend them because they are companies that I have found helpful and trustworthy. Please let me know if you have any questions about anything I have recommended!
The Harvest Beanie Crochet Hat Pattern:
Supplies/Materials:
To make one beanie, you will need:
- Size H-8 (5 mm) crochet hook.
- Knit Picks Twill Worsted Weight yarn in Gold Rush:
- Size S/M: 170 yards.
- Size L/XL: 230 yards.
- Scissors.
- Yarn/tapestry Needle.
- Pompom (optional).
Ad Free PDF File
The free crochet pattern for this fall crochet beanie is available right here on this page, as this site is sustained through ad support.
If you like things a little more streamlined, I’ve put together an ad-free, downloadable PDF version of the pattern. It’s perfect for easy printing and can be can be purchased through My Ravelry Store or by clicking the “Purchase PDF File” button to the right.
Thank you so much for your support! It means the world to me, and I’m beyond grateful to be able to share my passion with you all.
Sizes:
Child: Head circumference of 19-21 inches.
Adult: Head circumference of 21-24 inches.
Gauge:
16 stitches X 12 Rows = 4” in half double crochet.
Special Stitches & Abbreviations:
CH: Chain.
SC: Single Crochet.
HDC: Half Double Crochet.
SS: Slip Stitch.
Sts: Stitches.
Blo: Back Loop Only.
Front Post Treble Crochet (FPtr): Yarn over 2 times, insert hook from front to back to front around the post of the corresponding stitch below, yarn over and pull up loop [yarn over, draw through two loops on hook] 3 times.
Bobble Stitch (BS): *Yarn over, insert hook into stitch, yarn over and pull up a loop; yarn over, pull through two loops. Repeat from * three more times (four times total). There will be 5 loops left on the hook. Yarn over and pull through remaining loops on hook.
More Crochet Patterns from Leelee Knits!

The Harvest Beanie Crochet Hat Pattern Instructions:
Notes before you start:
- The pattern is written for both sizes using brackets as follows: Child (Adult). For example, where the instructions say, Brim will measure approximately 13 (15) inches, this means that the brim will measure 13 inches for the child size, and 15 inches for the adult size.
- When making a bobble stitch, the bobble will naturally pop to the inside of the hat. Simply use your finger to push the stitches through and pop the bobble out to the outside of the hat after making a bobble stitch to resolve this.
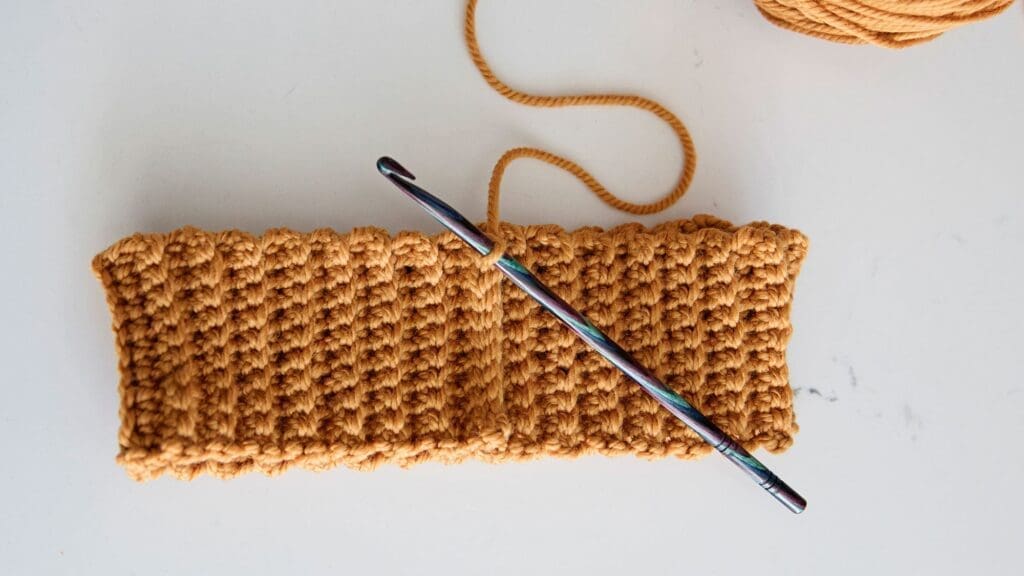
Brim:
The brim is worked flat and then the ends are joined together to form a circle.
Chain 11.
Row 1: SC in second ch from hook and in each remaining ch; turn (10 sts total).
Rows 2 – 56 (66): CH1; SC in blo of each sc; turn.
Brim will measure approximately 13 (15) inches unstretched.
Do not fasten off. Fold brim in half, lining up stitches of foundation chain row and last row to form a loop. CH1 and seam ends together by slip stitching through stitches of the foundation chain row and last row. Continue to Body of Hat.
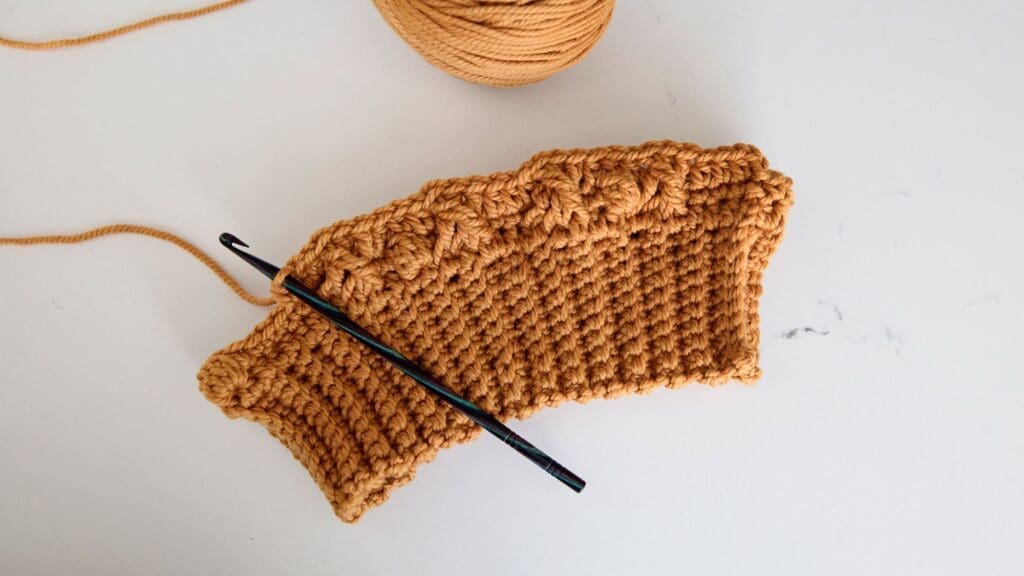
Body of Hat:
The body of the hat is worked in the round along the brim that was just completed.
Round 1: CH2 (does not count as a stitch); working around the brim, HDC 60 (72) stitches evenly spaced and join to first HDC with SS.
Round 2: CH1; SC in first 7 sts; *BS in next st, SC in next 11 sts; repeat from * to last 5 sts; BS in next st; SC in last 4 sts. Join to first SC with SS.
Round 3: CH2; *HDC in next 3 sc, [skip next sc, FPtr around each of the next 2 hdc two rows below; working in front of FPtr just made, FPtr around hdc two rows below skipped sc]; repeat from * to end of round. Join to first HDC with SS.
Round 4: CH1; SC in first st; *BS in next st, SC in next 11 sts; repeat from * to last 11 sts; BS in next st, SC in last 10 sts. Join to first SC with SS.
Round 5: CH2; skip first sc; *HDC in next 3 sts, [skip the next fptr two rows below and FPtr around each of the next 2 fptr; working in front of the FPtr just made, FPtr around skipped fptr]; repeat from * to end of round. Join to first HDC with SS.
Round 6: CH1; SC in first 7 sts; *BS in next st, SC in next 11 sts; repeat from * to last 5 sts; BS in next st; SC in last 4 sts. Join to first SC with SS.
Round 7: CH2; skip first sc; *HDC in next 3 sts, [skip the next fptr two rows below and FPtr around each of the next 2 fptr; working in front of the FPtr just made, FPtr around skipped fptr]; repeat from * to end of round. Join to first HDC with SS.
Round 8: CH1; SC in first st; *BS in next st, SC in next 11 sts; repeat from * to last 11 sts; BS in next st, SC in last 10 sts. Join to first SC with SS.
Round 9: CH2; skip first sc; *HDC in next 3 sts, [skip the next fptr two rows below and FPtr around each of the next 2 fptr; working in front of the FPtr just made, FPtr around skipped fptr]; repeat from * to end of round. Join to first HDC with SS.
Round 10: CH1; SC in first 7 sts; *BS in next st, SC in next 11 sts; repeat from * to last 5 sts; BS in next st; SC in last 4 sts. Join to first SC with SS.
Round 11: CH2; skip first sc *HDC in next 3 sts, [skip the next fptr two rows below and FPtr around each of the next 2 fptr; working in front of the FPtr just made, FPtr around skipped fptr]; repeat from * to end of round. Join to first HDC with SS.
Child Size: Continue to Shaping Crown and Finishing.
Adult Size: Repeat rounds 8-11 one more time and then continue to Shaping Crown and Finishing.
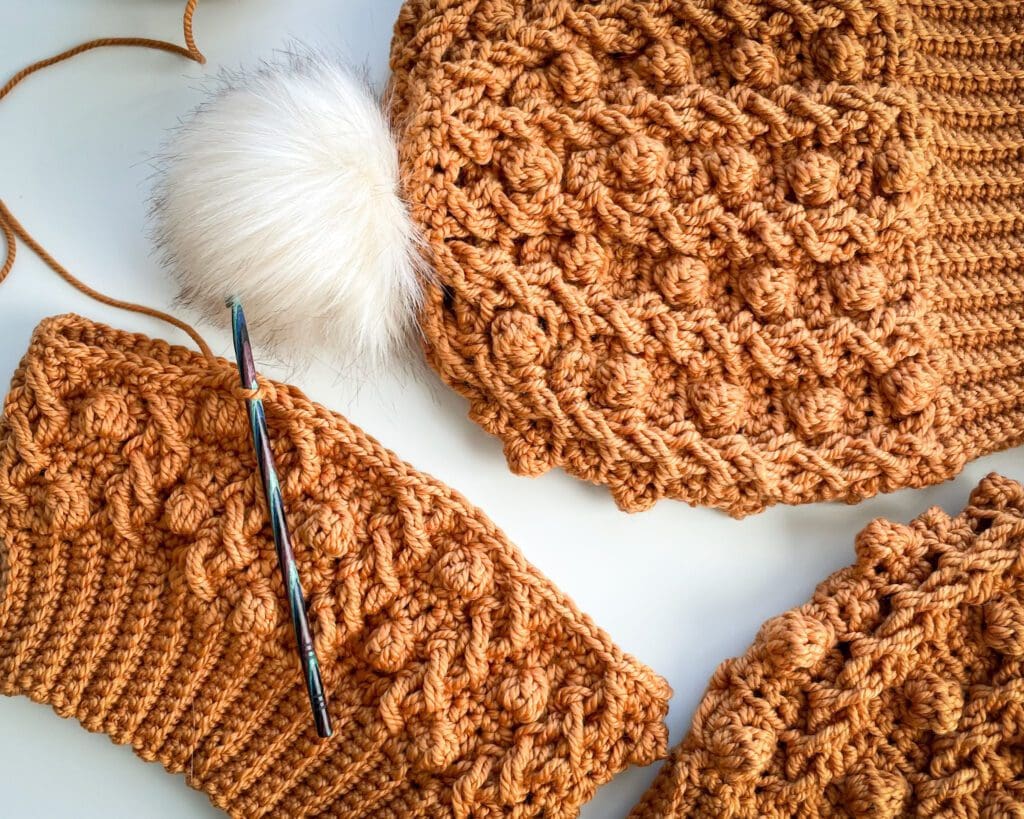
Shaping the Crown and Finishing:
Round 1: CH1; SC in first st; *BS in next st, SC in next 4 sts, SC3tog, SC in next 4 sts; repeat from * to last 11 sts; BS in next st, SC in next 4 sts, SC3tog, SC in last 3 sts. Join to first SC with SS. 50 (60) sts remain.
Round 2: CH2; skip first sc; *HDC in next 3 sts, [skip the next fptr two rows below and FPtr around each of the next 2 fptr; working in front of the FPtr just made, FPtr around skipped fptr], HDC next sc, [skip the next fptr two rows below and FPtr around each of the next 2 fptr; working in front of the FPtr just made, FPtr around skipped fptr]; repeat from * to end of round. Join to first HDC with SS.
Round 3: CH1; *SC3Tog, SC in next 7 sts; repeat from * to end of round. Join to first SC with SS. 40 (48) sts remain.
Round 4: CH2; skip first sc; *HDC in next st, [skip the next fptr two rows below and FPtr around each of the next 2 fptr; working in front of the FPtr just made, FPtr around skipped fptr]; repeat from * to end of round. Join to first HDC with SS.
Round 5: CH1; *SC2Tog, SC in next 2 sts; repeat from * to end of round. Join to first SC with SS. 30 (36) sts remain.
Round 6: CH2; *skip the next fptr two rows below and FPtr around each of the next 2 fptr; working in front of the FPtr just made, FPtr around skipped fptr; repeat from * to end of round. Join to first FPtr with SS.
Round 7: CH1; *SC2Tog, SC in next st; repeat from * to end of round. Join to first SC with SS. 20 (24) sts remain.
Round 8: CH1; *SC2Tog; repeat from * to end of round. Join to first SC with SS. 10 (12) sts remain.
Cut yarn, leaving a 10” tail.
Thread yarn onto tapestry needle, and weave through front loop of all stitches. Pull tight (like a drawstring) – this will clost the top of the hat. Making sure that top of hat is completely closed, secure tail on the inside of the hat.
Attach a pompom to the top of the hat (optional) and weave in all loose ends.
Fasten off, seam up the side of the hat and weave in all loose ends (watch the end of the video tutorial above for a demo of how to seam the ribbing).
Pattern PDF File
I hope you enjoyed this free fall crochet beanie pattern.
If you’d like your own copy, the Ad-Free PDF file (which will be emailed to you automatically) can be purchased through Ravelry, or by clicking the “Purchase PDF File” button to the right.
Thank you so much for your support! It means the world to me, and I’m beyond grateful to be able to share my passion with you all.